When I tell people my art is colored partially by digital means (Photoshop, usually), they’re often curious as to what specifically was done on the computer. Typically, if there is ever a large area of color, or some type of subtle gradation of color, or glowing/knocked out tone effects going on, that was done on the computer. None of those things are either cost effective, feasible, or possible with just markers alone.
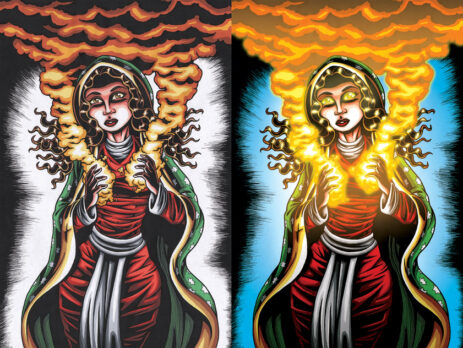
Typically, most of my art is done 75-90% by hand, and the rest digitally (some pieces are entirely digital, but that’s something I explore only occasionally so far). Often I have a good idea of what I’ll be leaving for the Photoshop stage, but sometimes I end up changing a lot more in post than I originally intended. Here are some before and after examples of some of my work. On the left is the marker-colored drawing that is scanned into the computer, and the right side is the finished, digitally-colored piece.

The blue background was done digitally, as well as the otherworldly glowing effects of the smoke and her eyes. The smoke aspect wasn’t just a single filter/effect, but a number of different elements to achieve a glowing around her hands, and a gradual darkening as it traveled up.

Not a whole lot was changed from the original drawing. The overall hue was added, and the background was darkened to give a greater sense of depth to the image. It may not sound like a lot of work, but clipping out the entire outline of the dragon’s head and claws was quite a meticulous task.

Again, not much was changed here. An overall hue was added, as well as the wrinkled paper texture. I fiddled with the color of her skin (including her painted face) to make it more brown-colored. Read about the process here.

All the color of the background was done digitally, as well as the wood grain texture. As with the above Day of the Dead piece, I adjusted her skin tone. Read about the process here.